DNS: Create or Manage Custom Nameservers
Notice: If you were sent here due to a migration, you will be able to find the IP addresses for your new name servers in both your start and completion e-mails. If you did not receive these or need additional help, please contact support and we can provide you with the new IP addresses.
Differences Between Generic DNS and Custom DNS
It’s important to understand that registering custom DNS servers is not the same as simply changing the DNS servers for a domain. Every domain on the Internet must use DNS, but custom DNS is a feature available to all of our cPanel-based account types (Reseller and cPanel VPS plans). Instead of using generic name servers that are used by other customers, custom DNS allows you to create name servers based on your own domain which provides you with a personal and more professional appearance. Both examples below will still perform the same function by providing you with DNS services to your hosted accounts, but custom DNS will be personalized to your domain:
Generic DNS:
Primary DNS: ns1-myservername.generichostingdomain.com
Secondary DNS: ns2-myservername.generichostingdomain.com
Custom DNS:
Primary DNS: ns1.mycompanyname.com
Secondary DNS: ns2.mycompanyname.com
If you choose to use custom DNS, you must first register these name servers at your registrar before they can be used by your websites. You only need to create your custom name servers once (or anytime your name server IP addresses change, like during a migration). We have provided step-by-step instructions below for how to create/update the custom name servers at several popular domain registrars. If there are no instructions for your registrar below, please contact the support department at your domain registrar and they should be able to assist you further.
How to Create or Update Custom DNS at Your Registrar
With most registrars you will find this listed under the domain management page under such titles as “Advanced Settings”, “Advanced Tools”, “Host Summary”, “DNS Hosts”, “Child Name Servers” etc.
Site5
You can update any domain which you have registered through us with the following instructions:
- Login to your billing (https://customers.site5.com/clientarea.php)
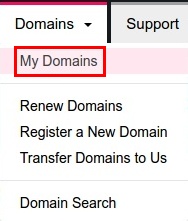
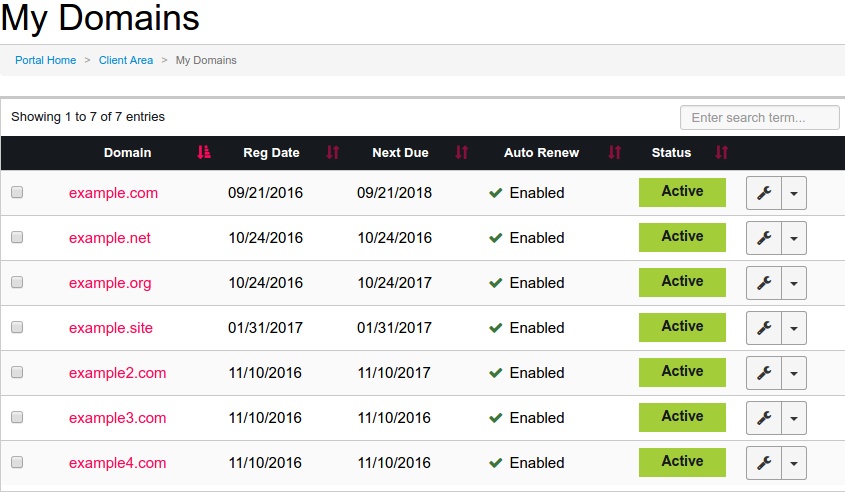
- Hover over Domains in the navigation bar and click on My Domains on the top navigation menu
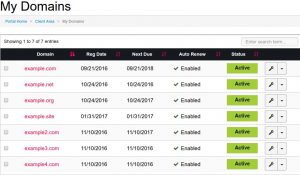
- Find the domain you need to update (Note: If you have numerous domains, you can use the search bar to narrow down your search.)
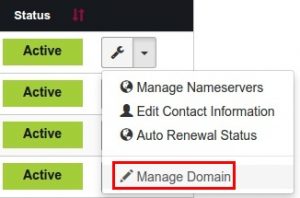
- Click on the arrow button on the far right of the row for the domain, and select Manage Domain
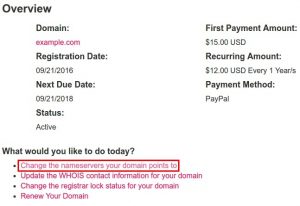
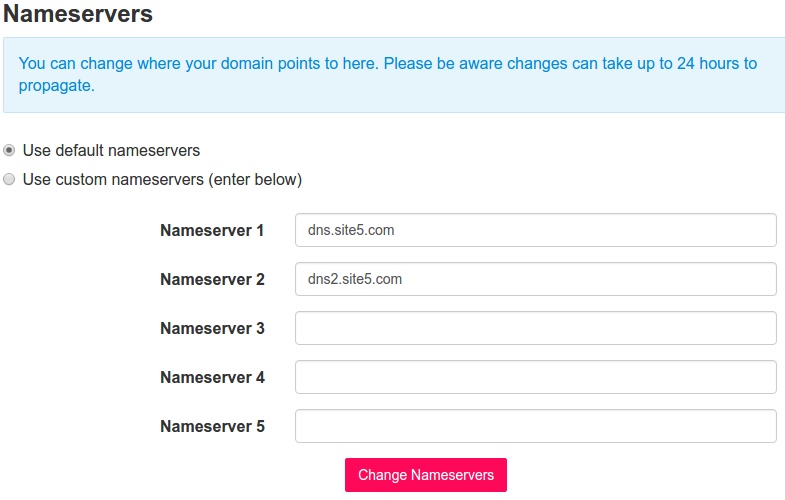
- Click Change the nameservers your domains points to
- Choose one of the following:
- Use Default nameservers will set the nameservers to the defaults for the Site5 server(dns.site5.com and dns2.site5.com) to which your domain is assigned
- Use Custom nameservers will use any nameservers you wish to use, such as private nameservers for reseller or VPS’s, or an external host
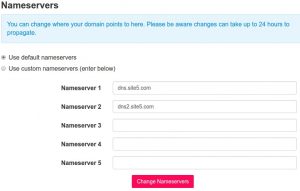
- Click Change Nameservers


Please note: After this type of change is made it typically takes 24 hours up to about 48 hours for nameserver information to fully propagate to servers worldwide. Propagation is an automatic process that occurs after any DNS changes take place, where local servers around the world updates their DNS cache with the new information. While propagation is occurring, you might see either a DNS error page if your domain was not previously pointed, or the content from your previous host, and your email for that domain may not work consistently.
We do recommend clearing your browser cache, and you may also wish to flush your DNS cache. You can find those instructions below:
If you wish to view your domain before propagation completes, we recommend editing your computer’s hosts file as described in this article: Editing your own hosts file prior to nameserver propagation
Dotster
- Open up your account information at Dotster and click the My Domains tab.
- Click the domain name you want to add the nameservers for. (not the checkbox)
- In the Name Servers section, choose the ‘Register NameServer’ link.
- Fill in the form with your nameserver name and IP address.
eNom
- Log in to your account at enom.com
- From the site menu select.. Domains >> Advanced Tools >> Register a Name Server
- That will bring up a page with forms for adding new nameservers and updating old.
- Add the nameserver name to the form (i.e. ns1.yourdomain.com), enter the old IP for the DNS server (if updating), and enter the new one provided in your migration complete email.
- Click the Update button and you are done.
GoDaddy/WildWestDomains
- Log in to your account at godaddy.com.
- Click the “My Account” link on the top right part of the GoDaddy website.
- Under the “My Domains” section, select the domain you wish to edit.
- Locate your nameserver in the bottom left of the Domain Details page, the section titled “Host Summary”.
- Select “Edit” to edit your private nameserver’s IP address or “Add” to add a new one.
Namecheap
- Log in to your account at namecheap.com
- Click the Manage Domains menu item
- Tick next to the domain you wish to edit and hit the Edit Selected button. That will bring up a page where you can edit all aspects of the domain.
- In the menu on the left you will see a link under “Advanced Options” for “Nameserver Registration”, click that link. That will bring up a page where you can add new name-servers or edit existing ones.
- On the bottom of the page under “EDIT EXISTING NAMESERVERS / FIND NAMESERVER STATUS” you can register new nameservers or change the IPs of your current nameservers.
Yahoo Domains/Small Business Solutions
You must email Yahoo Domains support to update or add DNS servers with them. Please follow the directions in this document.
http://help.yahoo.com/l/us/yahoo/smallbusiness/domains/domainfeatures/advanceddns/advanceddns-18.html
1&1 Internet
- Log into your account at 1&1 via http://admin.1and1.com
- Once logged in click on the ‘new’ tab under the Domain Overview section, then click ‘create subdomain’
- In the Create Subdomain section select the domain you want to use as a custom nameserver on the right then fill in the left feild with the prefix (in most cases ns1 or ns2 for Site5 resellers)
- Once done, locate the new subdomain (i.e. ns1.yourdomain.com) in the menu and tick the check box to the left. Then from the top menu click on the “DNS” section and click on “Edit DNS Setting”.
- In the DNS Setting page that loads, make sure the Domain Data is set to “DNS” the Basic DNS Settings :: Name Server* section set to “1&1 nameserver”
- In the Advanced DNS Settings section of that page, under “IP Address (A record)*”, change it to “Other IP Address”. Then enter the ip address specified in your welcome email from Site5.
- Repeat steps 2-6 for your second DNS server (i.e. ns2.yourdomain.com)
- You will have to wait at this point until the status of the domain shows as ‘Ready’ (under status in the domains overview).
- If you want the domain to now use the nameservers you have just created follow these steps. Open the domain again from the domain overview section. Tick the box next to the domain and click ‘edit DNS settings’ from the ‘DNS’ drop down menu. From the ‘DNS Settings’ page, under ‘Advanced DNS Settings’, change the primary nameserver and 1st secondary nameserver to the DNS servers you created above (ns1.yourdomain.com/ns2.yourdomain.com).
Network Solutions
- Login to your account at networksolutions.com by clicking Login Here in the upper right corner, then enter your user and password on the next page.
- Click “Manage Host Servers” in the menu on the left
- Then enter the name of the nameserver (example: ns1.yourhost.com) you want to create or edit in the first box on the Manage Host Servers page, and click the “Continue” button
- Enter the IP of the name server provided by Site5 in the box on the next page, click “Continue”
- Confirm the details on the next page, click “Apply Change” if correct
- Repeat steps 2-5 for your second nameserver (example: ns2.yourhost.com)
OpenSRS/Tucows
- Login to your account at manage.opensrs.com by entering your domain name, user and password, then clicking “Manage Domain”
- On the domain management page you will scroll to the bottom of the page where you will see a link titled “If you want to create or modify a nameserver which is based on yourhostdomain.com click here” (Ignore the nameservers link in the main top menu!)
- On the next page scroll down to the section titled “Create nameserver”. In the first field enter the host prefix for you first server (example: ns1). In the second box enter the IP provided by Site5. Click the “Create Nameserver” button.
- Repeat step 3 for your second DNS server (ns2)
- You will now see your DNS servers listed on the page where you can edit or delete them
Directi
- Login to your Domain Control Panel
- Search for the Domain Name you wish to manage Child Name Servers for from Domains >> Search >> Domain Registration Search
- Click the domain name you want to create Child Name Servers under
- Click the “Manage Child Name Server” button
- Enter the hostname (example ns1.youhost.com) of the Child Name Server you wish to create in the Add New Child Name Server box, then enter it’s IP address in the second box.
- To Modify a DNS server make the modifications in the IP Address text box and click on “Modify IP Address”
Name.com
- Log into your account.
- Click on the “My Account” image at the top of the page.
- Click on the appropriate domain name.
- Click on “Manage Name Servers” under the Control Panel navigation list.
- To add a new name server, enter the Host Name and IP address for each name server you wish to create.
- To modify an existing name server, enter the appropriate new IP address for the respective hostname and click Add. Click the “remove” link next to the old IP address for each hostname.
James Davey July 9, 2015 at 5:15 am
Hello Rebecca,
This is possible, yes. However, your reseller account will have default ones enabled, and all accounts would use these when created. You would need to manually adjust the resold accounts in WHM o use different nameservers.