FTP: Create and manage additional FTP accounts
The FTP Accounts is a feature of your SiteAdmin or cPanel that gives you ability to create or remove, or reset an additional FTP account password.
Why use additional FTP accounts? The primary reason for creating and managing multiple FTP accounts is for security reasons. The less instances of you using your SiteAdmin or cPanel password to connect the less risk that it can be compromised. If you are going to have outside developers complete work on your website it is highly encouraged that you create a secondary FTP account to ensure that said developer does not gain access to your SiteAdmin or cPanel.
Note: Additional FTP accounts will not have the ability to connect via SSH or SFTP. In order to connect to our servers using those two methods, you will need to use your SiteAdmin or cPanel username and password.
Note 2: The FTP accounts section does not give you the ability to change the SiteAdmin or cPanel FTP password. In order to do, please see our change password guide contained with the Related Articles section at the bottom of this guide.
Manage FTP accounts in SiteAdmin
This demo assumes you’ve already logged in to SiteAdmin
Firstly we will create a new FTP account, then we will demonstrate how you can modify or remove it.
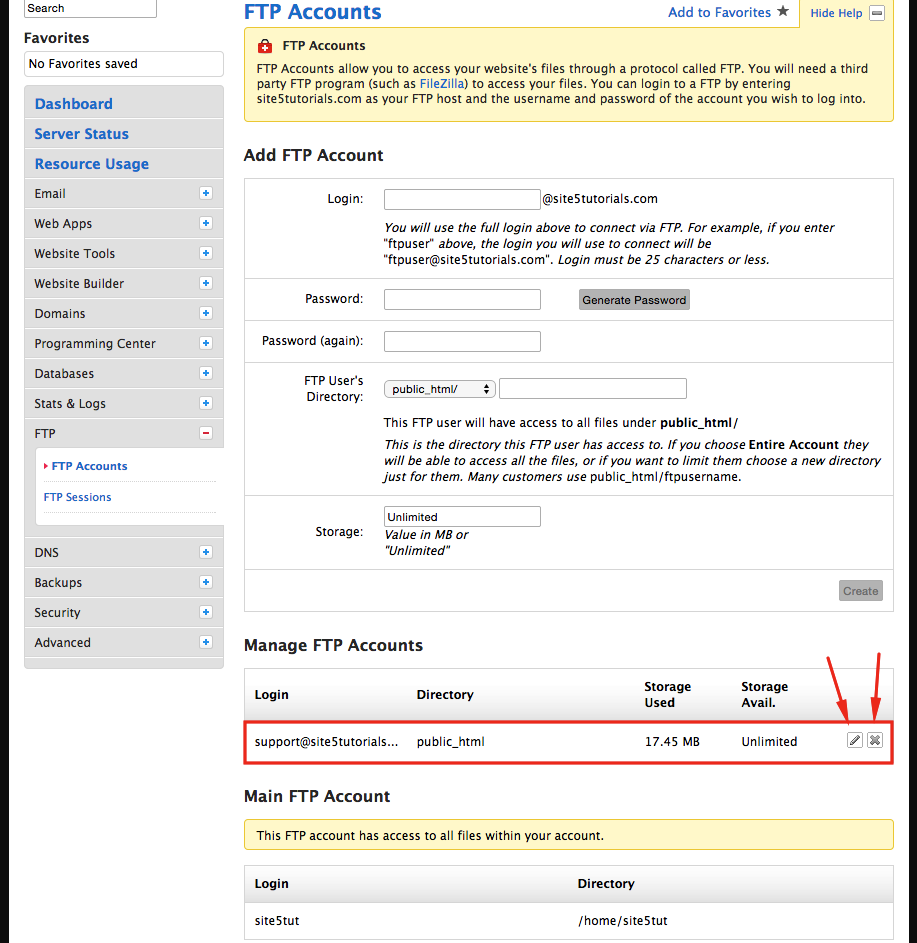
1) Click the FTP option from the left menu, then click FTP Accounts or select FTP Accounts icon from the main menu.

2) Now we will need to fill in the necessary details:

- User: username of the new user (username will need the @yourdomain portion in order to log in)
- Password: password of the account (use the generate password for a secure password)
- Password (again): retype or copy/paste the password into here
- FTP Users Directory: This will fill in automatically with the username. If you leave /username in the directory box, then the newly created user will only have access to the /username directory, and all folders under it. To give the user access to the entire website, you would delete everything except the forward slash “/”. You can also pquota limit on this FTP account if you wish
- Quota: If you wish to restrict how much space a particular FTP client can occupy.
Thats it! You were able to create an account.
3) We now see the freshly created account below under Manage FTP Accounts that shows us the full username, the directory they have access to and their quota.
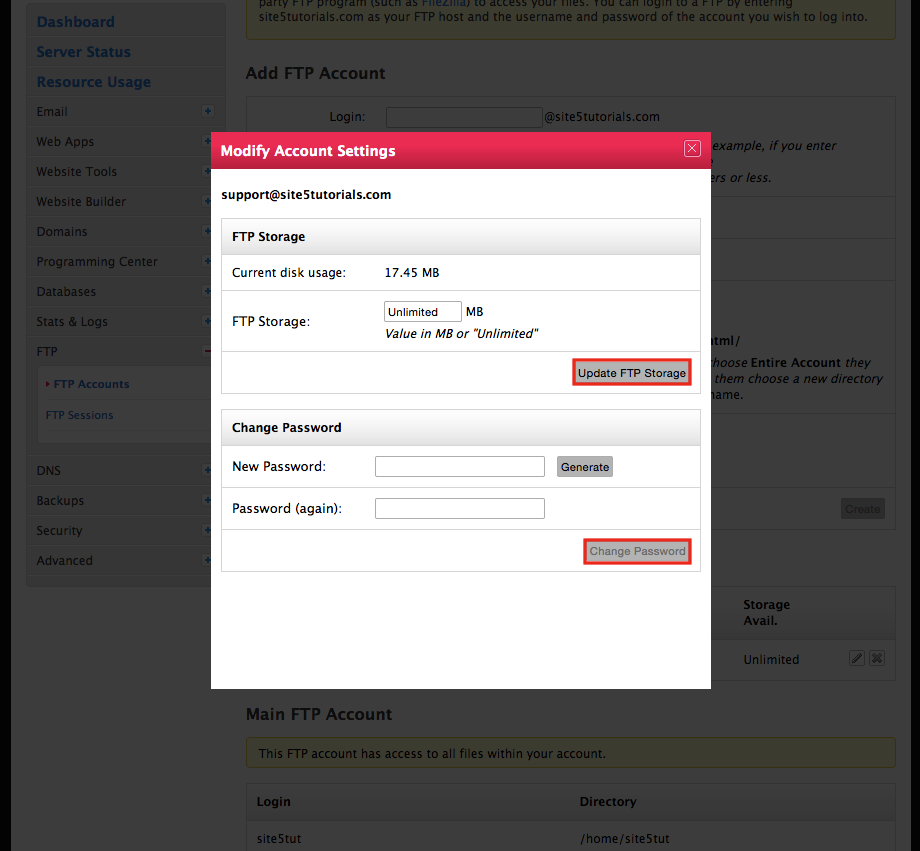
![]() Pencil Icon: Brings up the edit menu where you can change the quota and password for this account. To adjust the quota enter the new quota and then select Update FTP Storage. To adjust the password simply enter a new password or choose a new randomly generated one and then select Change Password.
Pencil Icon: Brings up the edit menu where you can change the quota and password for this account. To adjust the quota enter the new quota and then select Update FTP Storage. To adjust the password simply enter a new password or choose a new randomly generated one and then select Change Password.
![]() X Icon: This removes the account from the server. This does not remove any data/files that they may have uploaded.
X Icon: This removes the account from the server. This does not remove any data/files that they may have uploaded.
Note: In order to change the directory for an existing account, you will have to remove the account and then create a new account with the new directory.
Thats all folks! Happy FTP’ing!.
Manage FTP accounts in cPanel
This demo assumes you’ve already logged in to cPanel
Firstly we will create a new FTP account, then we will demonstrate how you can modify or remove it.
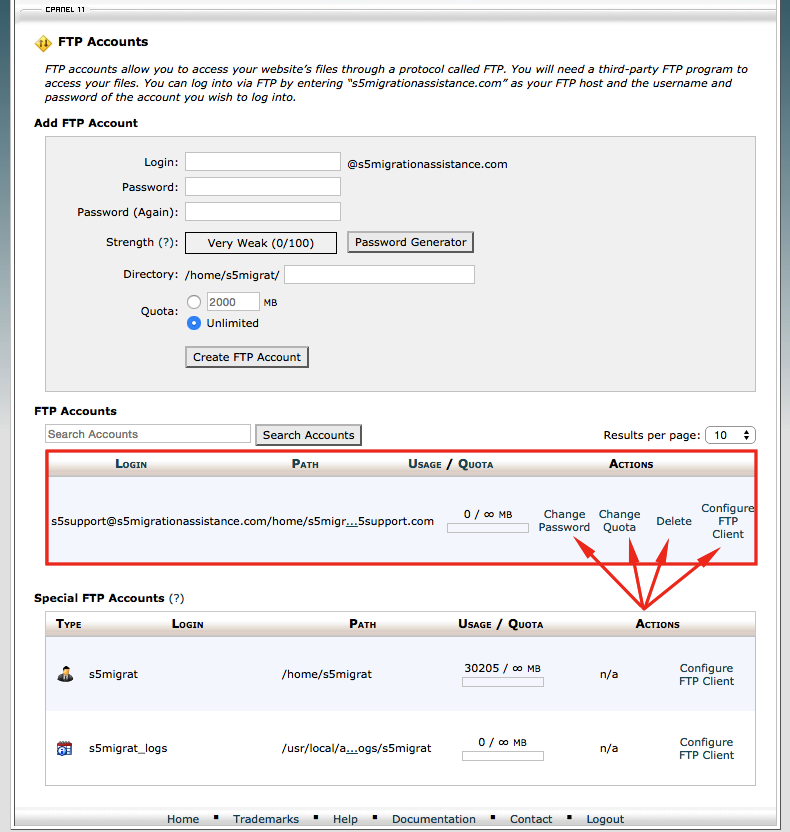
1) Click the FTP Accounts icon

This is where you manage your FTP accounts

2) To create a new FTP account, enter a new login here…

- User: username of the new user (username will need the @yourdomain portion in order to log in)
- Password: password of the account (use the generate password for a secure password)
- Password (again): retype or copy/paste the password into here
- FTP Users Directory: This will fill in automatically with the username. If you leave /username in the directory box, then the newly created user will only have access to the /username directory, and all folders under it. To give the user access to the entire website, you would delete everything except the forward slash “/”. You can also pquota limit on this FTP account if you wish
- Quota: If you wish to restrict how much space a particular FTP client can occupy.
Thats it! You were able to create an account. We now see the freshly created account below under Manage FTP Accounts that shows us the full username, the directory they have access to and their quota.
3) From here you can change the FTP account’s password, change it’s quota, or delete the account altogether
Note: In order to change the directory for an existing account, you will have to remove the account and then create a new account with the new directory.
Thats all folks! Happy FTP’ing!.
Yves May 7, 2016 at 1:47 pm
I would put this very important information, underlined or enlighted: (username will need the @yourdomain portion in order to log in)
Kindly,
Yves
Corey Mahon May 25, 2016 at 9:48 am
Hi Yves!
Great suggestion, we’ve made the changes to the article and that line now stands out even more!