Email: How To Setup a IMAP Account In Mac Mail 6
Please note this tutorial is specific to Mac Mail 6. To determine the version of mac mail in which you are using. Please see below:
- Open Mac Mail
- Select Mail
- Select About Mail
If you are using version different then Mac Mail 6, please see the links at the bottom of this article for a guide specific to your version.
1) Open Mac Mail
2) Click Accounts from the under the File menu.

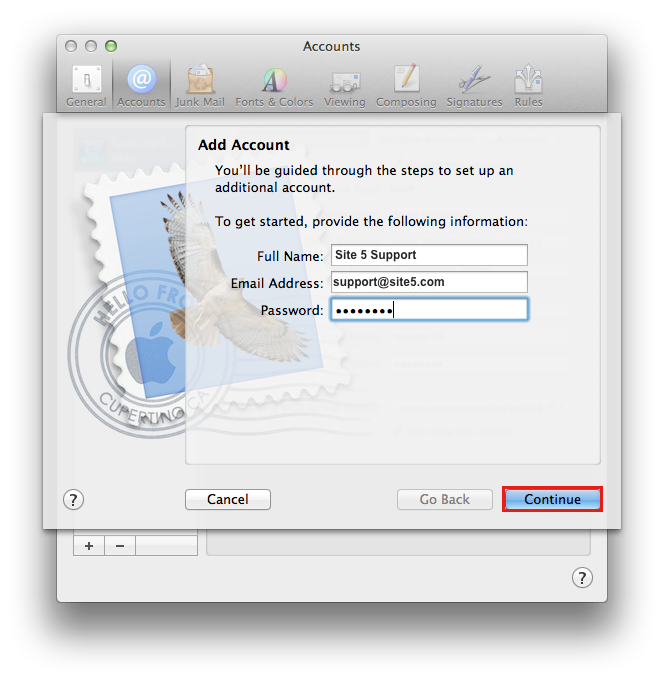
3) You will now enter your details for your email account. When complete click Continue.
- Full Name = Your name that will be displayed on outgoing email messages
- Email Address = Your full email address
- Password = Your email account password
4) You will now need to enter your details once again.
- Full Name = Your name that will be displayed on outgoing email messages
- Email Address = Your full email address
- User Name = Your full email address
- Password = Your email account password
Pro Tip: If you hold the option key down on your mac while at the above menu, the “continue” button will turn into a “next” button, which enables you to skip the automatic discovery feature and configure your account manually using the details that were provided to you in your welcome letter.

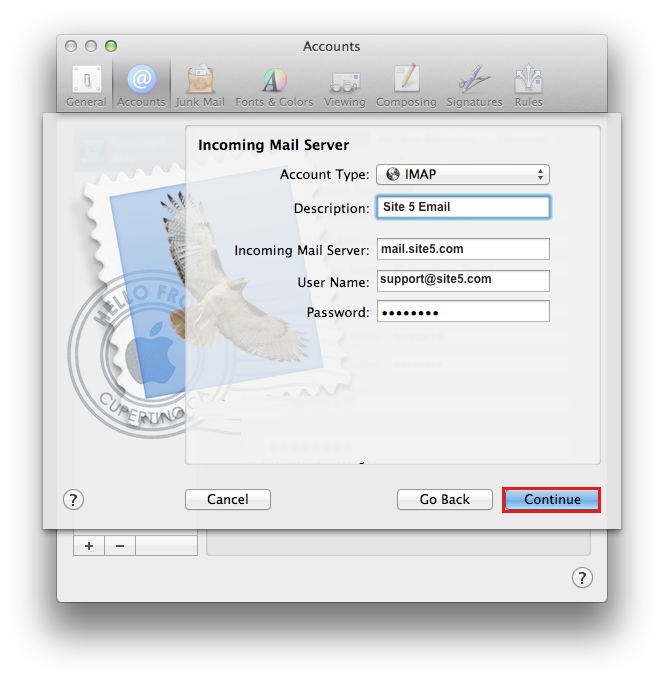
5) After we have skipped the automatic configuration, we are taken into a manual setup. This is where we will specify the settings needed to connect your Mac Mail to your inbox on our server.You will enter the details below and then select Continue.
- Account Type = IMAP
- Description = This could be whatever you would like displayed in your Mac Mail
- Incoming Mail Server = mail.yourdomain.com (where yourdomain.com is your website address minus the www)
- Username = Your full email address
- Password = Your email account password
Note: To connect via SSL – Enter the hostname for the server in which you are hosted on into the Incoming Mail Server field.You can retrieve this server information from your welcome letter or our support team.
6) Now we see that it is asking about SSL. If you added the hostname to the incoming server as instructed in the previous step, you can leave this checked. If you do not wish to use SSL or do not know what it is, simply uncheck this.
- Select Password from the dropdown list.
- Click Continue.

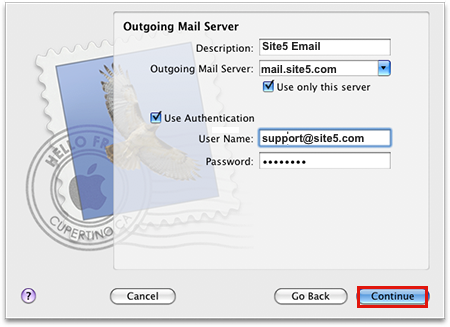
7) We have now arrived to a place where we need to configure our outgoing settings so you can send email from your mac mail. Enter the details below and click Continue.
- Description = This could be whatever you would like displayed in your Mac Mail.
- Outgoing Mail Server = mail.yourdomain.com (where yourdomain.com is your website address minus the www).
- Place a check mark in Use only this server.
- Place a check mark in Use Authentication.
- Username = Your full email address.
- Password = Your email account password.
Note: To connect via SSL – Enter the hostname for the server in which you are hosted on into the Incoming Mail Server field.You can retrieve this information from your welcome letter or our support team.
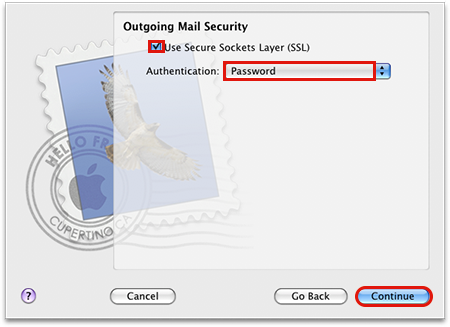
8) Now we see that it is asking about SSL once again. If you added the hostname to the outgoing server as instructed in the previous step, you can leave this checked. If you do not wish to use SSL or do not know what it is, simply uncheck this.
- Select Password from the dropdown list.
- Click Continue.
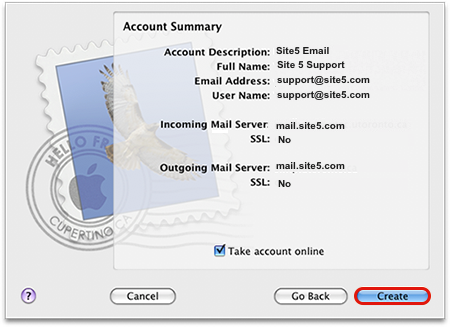
9) We are almost done! You will see a screen that will display all the details you have entered. If everything checks out, then you click and Create.
You will now be taken back to your account screen where you will see your newly named account there.
You should now be on your way to sending/receiving email with your account!.