Email: Configure Spam Assassin
As mentioned in our Spam Assassin Overview article, the Spam Assassin program can be quite powerful when configured correctly. The guide below is designed to assist you in the process.
- How to activate & configure Spam Assassin in SiteAdmin:
- How to active & configure Spam Assassin in cPanel:
Configuring Spam Assassin in SiteAdmin
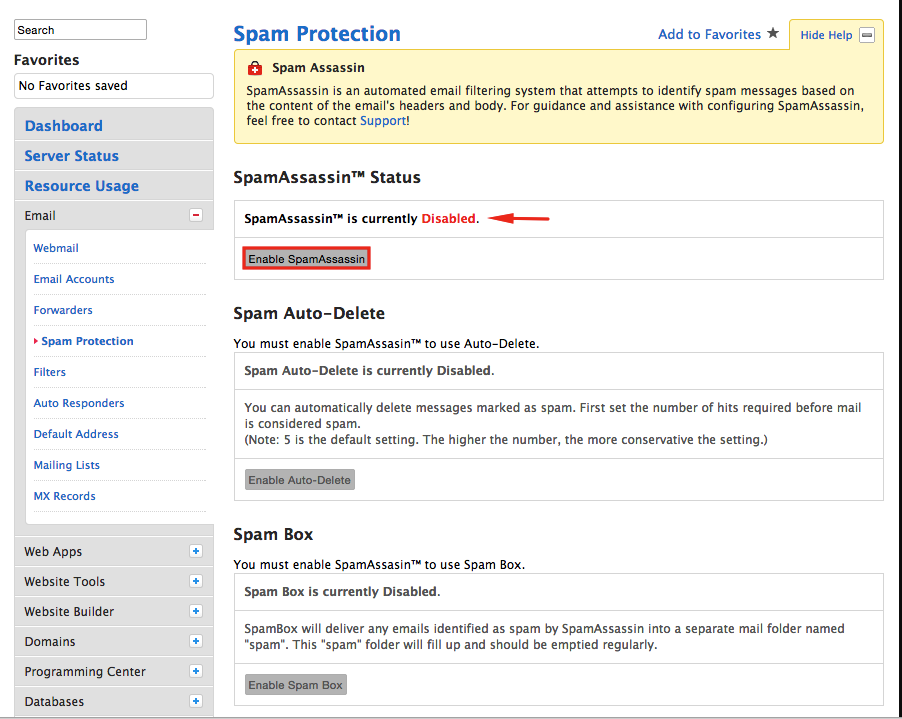
1) Log into SiteAdmin, select Email from the left hand side menu and select Spam Protection. Or select the icon from the menu.

2) We will now need to activate Spam Assassin before we can start configuring. Select Enable Spam Assassin.
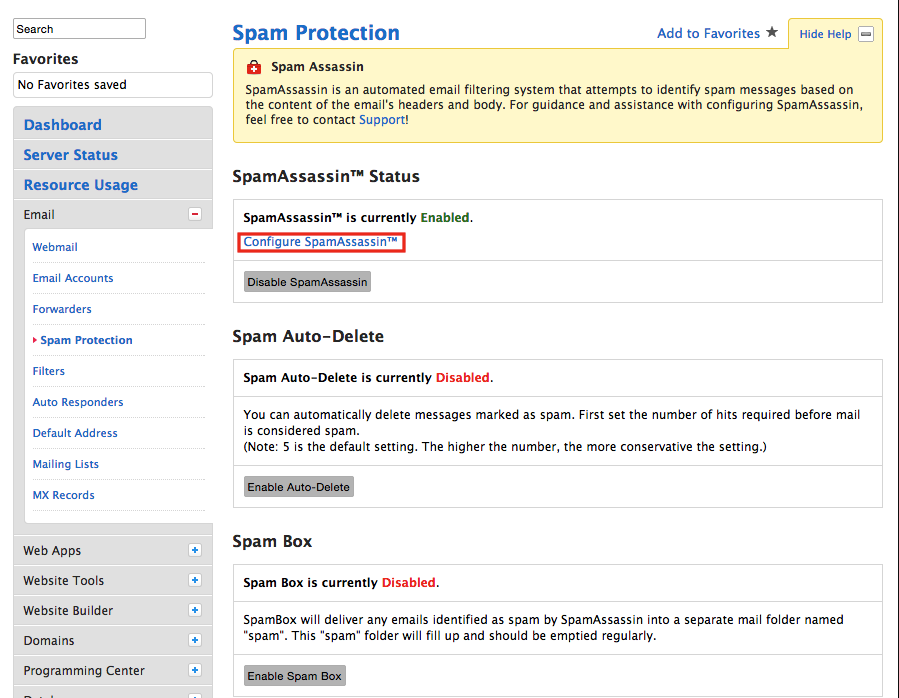
3) Now that its enabled, you will see a few other features now have the word Disabled beside them. This is normal behaviour and we will address those boxes in a a bit further down in the guide. For now we will select Configure Spam Assassin.
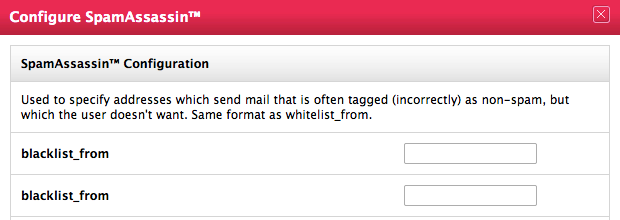
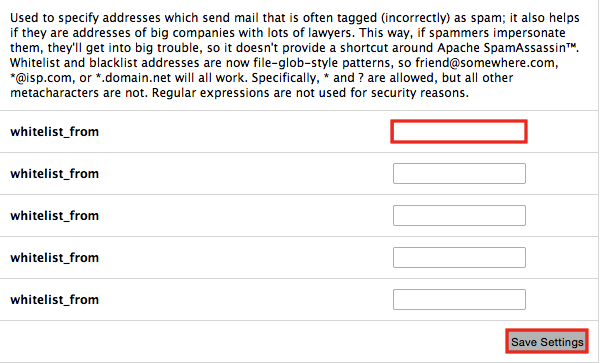
4) Inside this popup window you will see numerous fields that you can fill out. With the blacklist and whitelist fields, you can simply enter a email address that you want to block or allow. Alternatively if you wish to block or allow all email from a particular domain, use the wild card feature (*@domain-to-black-or-white-list.com)
Note: Should you find yourself in a situation where you need to enter more addresses/domains then the fields presently allow for, simply save the existing changes you have done, which will take you back to the Spam Assassin panel. Select Configure Spam Assassin again and you will now have more fields available to you.
blacklist_from = This allows you to specify email addresses or domains that you wish to block from being able to email you. Once listed here, any messages from the recipient or domain specified will be not be received by you.
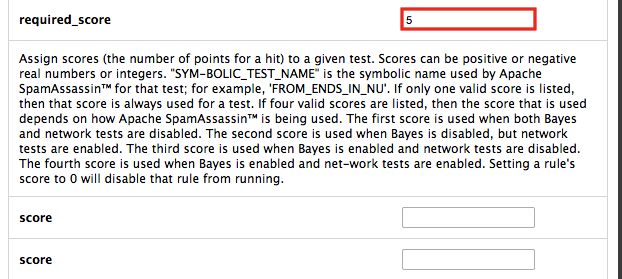
required_score = This allows you to adjust how sensitive Spam Assassin is to incoming emails. By default, the score is set to 5 which is a good starting point as it will pick up a majority of the spam that comes to your email. If you notice that a good number of spam messages are still coming through, you could try lowering this number to 3 or 4. While on the other hand, if you notice that legitimate emails are not making it to your inbox, you could try increasing the number to 7 or 8 to see if this alleviates the problem.
whitelist_from = This allows you to specify email address or domains that you wish to allow through the Spam Assassin filter. This is helpful when you encounter particular email addresses or domains that you are getting flagged as spam when they shouldn’t be.
5) Now that we have the determined how to blacklist, whitelist and adjust the aggressiveness of the filter, lets now tell Spam Assassin to do with the messages it detects as spam. We have two options available: Spam Auto-Delete or Spam Box.
6) Spam Box:
 Spam Box allows you to send all messages marked as spam by SpamAssassin to a folder in your email account called “Spam.” Doing this allows you to double check that the emails that get marked as spam so that you don’t miss any important email messages. It is a good idea to check this folder from time to time and clear it out so that it does not build up.
7) Spam Auto-Delete:
 Spam Auto-Delete is an extra layer of functionality. It allows you to delete all messages based a separate score level. When you enable it, you can set the auto-delete score to 8, and leave the normal SpamAssassin score at 5. By doing this, all messages with a score higher than 8 will automatically be deleted, while any emails with a score between 5 and 8 will still be moved to your or inbox or spam folder (if enabled).
If you do not enable the Spam Box or Spam Auto-Delete features, then by default any messages detected as being spam will have be directed to your inbox with ***SPAM*** added to the subject line.
Thats it! Your Spam Assassin is configured to do the most basic level filtering. If you want to learn how to use Spam Assassin to train itself on what spam messages it should filter and what ones it shouldn’t check out the related article at the bottom of this page.
Configuring Spam Assassin in cPanel
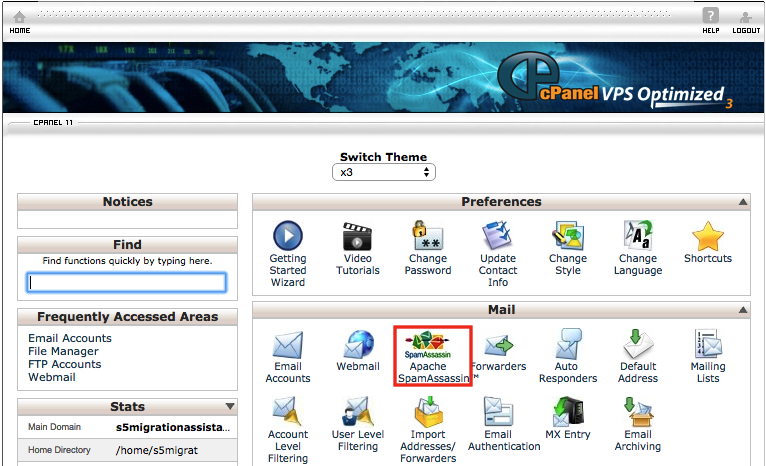
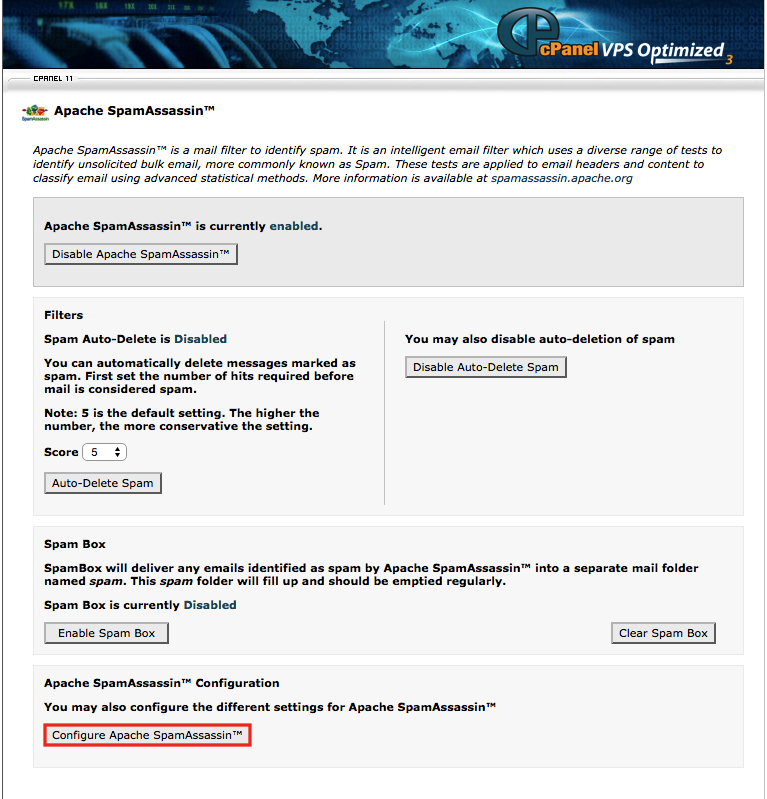
1) Log into cPanel, select the Apache Spam Assassin icon from the menu.
2) We will now need to activate Spam Assassin before we can start configuring. Select Enable Spam Assassin.
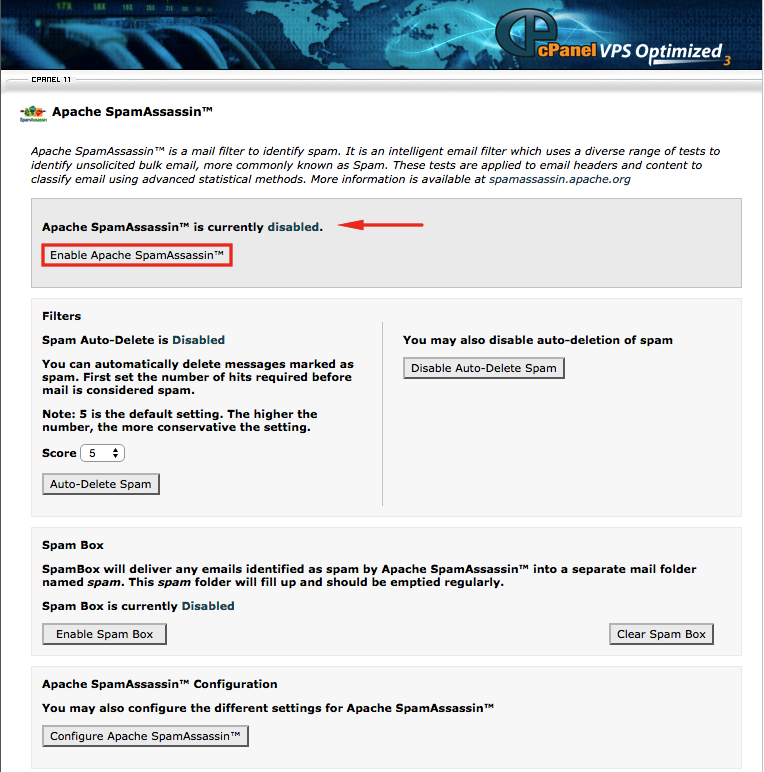
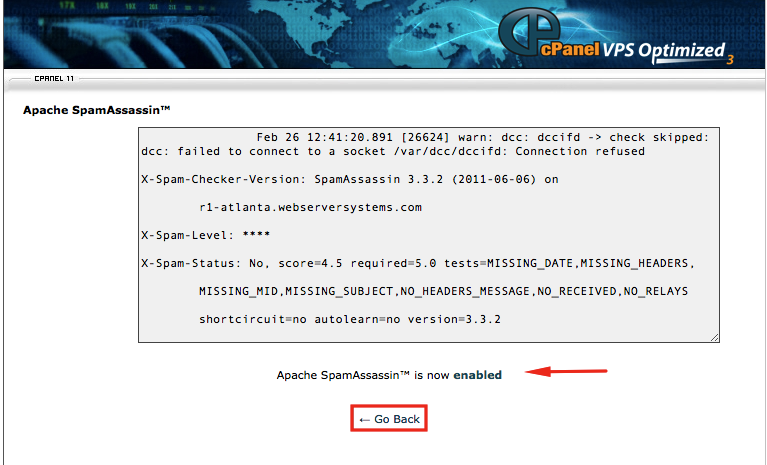
3) You are taken to a screen that now shows you that the service has been enabled, select the Go Back button.
4) Now we will need to tell Spam Assassin how to operate. To do this select Configure Spam Assassin.
5) The screen you will be taken to will now present you with a number of fields in which you can customize. With the blacklist and whitelist fields, you can simply enter a email address that you want to block or allow. Alternatively if you wish to block or allow all email from a particular domain, use the wild card feature (*@domain-to-black-or-white-list.com)
Note: Should you find yourself in a situation where you need to enter more addresses/domains then the fields presently allow for, simply save the existing changes you have done, which will take you back to the Spam Assassin panel. Select Configure Spam Assassin again and you will now have more fields available to you.
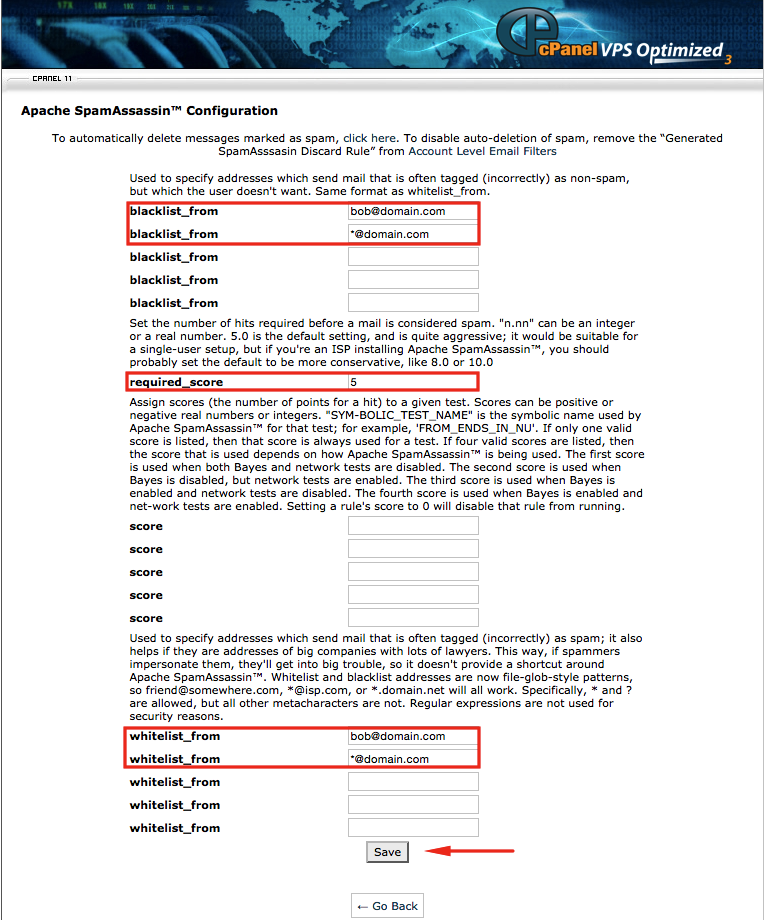
blacklist_from = This allows you to specify email addresses or domains that you wish to block from being able to email you. Once listed here, any messages from the recipient or domain specified will be not be received by you.
required_score = This allows you to adjust how sensitive Spam Assassin is to incoming emails. By default, the score is set to 5 which is a good starting point as it will pick up a majority of the spam that comes to your email. If you notice that a good number of spam messages are still coming through, you could try lowering this number to 3 or 4. While on the other hand, if you notice that legitimate emails are not making it to your inbox, you could try increasing the number to 7 or 8 to see if this alleviates the problem
whitelist_from = This allows you to specify email address or domains that you wish to allow through the Spam Assassin filter. This is helpful when you encounter particular email addresses or domains that you are getting flagged as spam when they shouldn’t be.
6) Now that we have the determined how to blacklist, whitelist and adjust the aggressiveness of the filter, lets now tell Spam Assassin to do with the messages it detects as spam. We have two options available: Spam Auto-Delete or Spam Box.
7) If you do not enable the Spam Box or Spam Auto-Delete features, then by default any messages detected as being spam will have be directed to your inbox with ***SPAM*** added to the subject line.

Spam Box allows you to send all messages marked as spam by SpamAssassin to a folder in your email account called “Spam.” Doing this allows you to double check that the emails that get marked as spam so that you don’t miss any important email messages. It is a good idea to check this folder from time to time and clear it out so that it does not build up.
Spam Auto-Delete is an extra layer of functionality. It allows you to delete all messages based a separate score level. When you enable it, you can set the auto-delete score to 8, and leave the normal SpamAssassin score at 5. By doing this, all messages with a score higher than 8 will automatically be deleted, while any emails with a score between 5 and 8 will still be moved to your or inbox or spam folder (if enabled).
Thats it! Your Spam Assassin is configured to do the most basic level filtering. If you want to learn how to use Spam Assassin to train itself on what spam messages it should filter and what ones it shouldn’t check out the related article at the bottom of this page.
Greg Robinson September 4, 2015 at 2:08 pm
“Score” text box under “Blacklist_from” area – Below Paragraph starting with: “Assign scores (the number of points for a hit) to a given test. Scores can be positive…” is not addressed. Said paragraph is cryptic as it appears to be out of context with no supporting information eluding as to it’s purpose, function, or configuration.
Perhaps a spamassassin domain expert – knowledgeable on every level of spamassassin would understand. But I do not.
Please address. Thank you
James Davey September 7, 2015 at 5:11 am
Hello Greg,
I am sorry for any confusion. The assigned score is the number of ‘markers’ needed for a message to be considered spam. The lower the value you enter here, the more strict Spam Assassin will be – 5 is the default setting, and usually is more than enough. Scores as low as 3 can be used, but you start to run the risk of legitimate mail being flagged as spam if you go much lower than that.
T.Rob April 6, 2016 at 3:29 pm
Neither this article nor the help screen mention what the delimiter is between addresses in the whitelist or blacklist fields. Comma delimited? Semi-colon delimited? Colon delimited? Tab delimited? Space delimited? Many of your customers can figure this out through trial and error but it would be helpful to just tell us the required syntax.
Also, Spam assassin allows hierarchical white/black listing. For example in native Spam Assassin it is possible to blacklist *@example.com while allowing [email protected]. Is that functionality supported here? If so, how?
Corey Mahon April 7, 2016 at 8:32 am
Hi T.Rob!
I apologize for the confusion, you wouldn’t need to use a delimiter for adding multiple entries in one field. If you were to fill up all of the blacklist/whitelist fields and submit, more would be available for you to type into. This prevents the need for using a delimiter and putting all entries in one text box.
As for the hierarchial white/blackisting, this is something that should work on our systems since the whitelisted email address would be allowed to pass. If you try using this setup and run into problems, please do contact our support team via ticket through your backstage panel and we’ll be glad to look into it.
T.Rob April 7, 2016 at 10:44 am
Thanks. Just FYI, I filled up all the fields and no new ones were generated. I’m using Firefox with auto-update turned on. Are there browser requirements for Backstage?
T.Rob April 7, 2016 at 11:02 am
Got it working. It doesn’t generate the new fields dynamically as part of the AJAX in the fly-out dialog. The user has to back completely out of the data entry screen and let Backstage re-render it. Not terribly intuitive but usable once the customer figures it out. Thanks for the reply. Knowing how it’s supposed to work got me to keep trying different things until it behaved as described.
Corey Mahon April 12, 2016 at 8:59 am
Excellent! You are right, it’s not the most intuitive but, I am glad to hear that you’ve been able to get it to work properly!
T.Rob April 6, 2016 at 3:33 pm
In the mail harvesting article Site5 advises customers to avoid mailto: links in web pages. After my last comment, I see that Site5 converts valid email addresses in comments to mailto: links, doing the exact thing they advise us customers to not do. Any chance you will modify the behavior in comments to follow your own advice and not convert email addresses to hot links? Perhaps even obfuscate them by using HTML entities?
Corey Mahon April 7, 2016 at 8:35 am
Hi T.Rob,
We don’t make automatic changes to coding on customer’s sites. So, the converting you are seeing may be due to the CMS being used. We would be glad to look into why this is happening, if you have any examples of where you’re seeing the email address automatically being converted to a mailto: link, please do open a ticket with our support team and we’ll be glad to find out why the conversion is happening.
T.Rob April 7, 2016 at 10:51 am
Hi Corey, I’m not talking about customer sites,. I’m talking about comments in Site5’s Knowledge Base. Here’s the example you were asking for:
[email protected]
Since I can’t enter HTML here, it’s not me making that clickable. Site5’s comment functionality in the KB converted a text string in my comment to a clickable mailto: link – something Site5 advises customers specifically to NOT do.
Corey Mahon April 12, 2016 at 9:08 am
I understand, thank you for clarifying. You are right, it appears that a new update has added this ‘feature’. We’ll get this checked out and see if that can be disabled.