SSH: How to generate keys and connect to your account with PuTTY (Windows)
Note: You do NOT need to generate/use keys to access your Site5 account via SSH.
This tutorial will show you how to generate a public/private SSH key pair on a Windows operating system using PuttyGen (PuTTY Key Generator) and then install that on your Site5 account so you can use SSH keys for authenticating.
1. Download the PuTTY installer here.
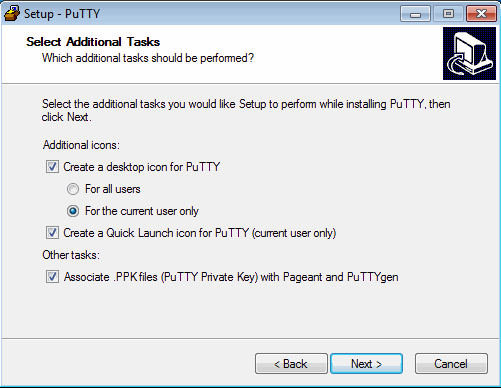
2. After the files finish downloading, launch the installer and follow the on-screen instructions to install the PuTTY software. The default install location is fine, but I would recommend selecting the following options under the “Select Additional Tasks” screen:
* Create a desktop icon for PuTTY
* Create a Quick Launch icon for PuTTY (current user only)
* Associate .PPK files (PuTTY Private Key) with Pageant and PuTTYgen
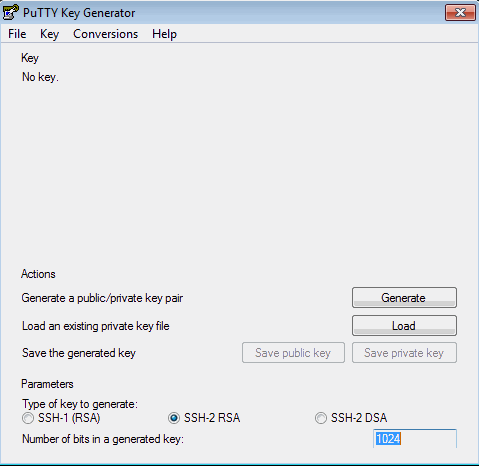
3. Once the install is finished, launch PuTTYgen (which can be found in your Start Menu under “PuTTY”)
4. When PuTTYGen launches, you can keep all of the default settings, so you shouldn’t need to change anything (listed below)
* Type of key to generate: SSH-2 RSA
* Number of bits in a generated key: 1024
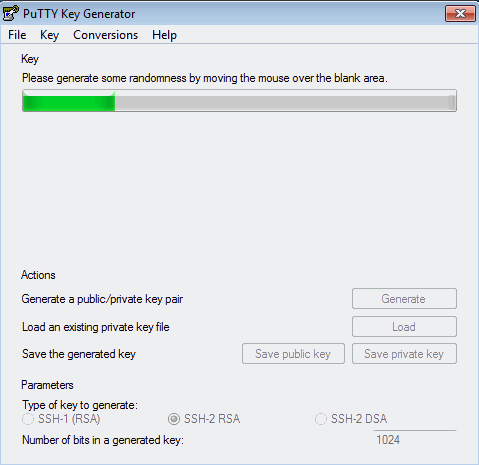
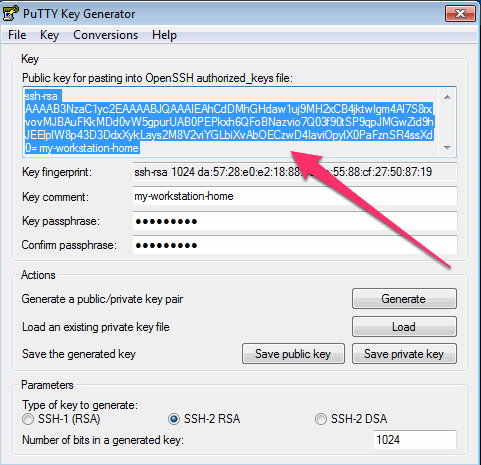
5. Now, click on the “Generate” button to create your key pair. You will need to move your mouse around within that blank space during that process.
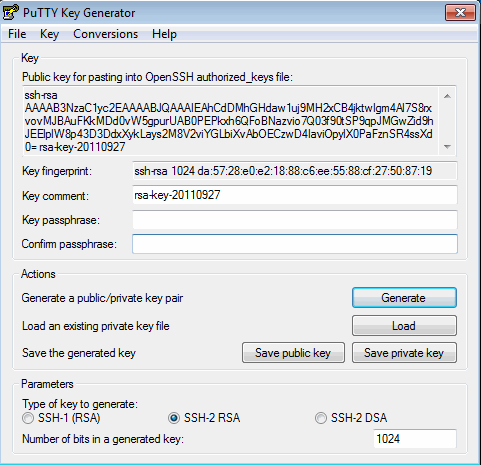
6. Once the generator is complete, you will see a window with your new public key and key fingerprint.
7. Next, feel free to change the “Key comment” to anything you would like. I usually indicate the workstation name in the comment so I know where it came from. Something like “my-workstation-home.”
8. You then need to fill in the “Key passphrase” and the “Confirm passphrase” fields. These are important, make sure you set a passphrase! It should be a secure passphrase and one that is not easily guessable nor should it be used anywhere else.
9. You now need to select the contents of the public key in that large text field and copy the entire contents (control + C) into your clipboard. Do not quit PuTTYGen. Your public key will look similar to the below:
ssh-rsa AAAAB3NzaC1yc2EAAAABJQAAAIEAhCdDMhGHdaw1uj9MH2xCB4jktwIgm4Al7S8rxvovMJBAuFKkMDd0vW5gpurUAB0PEPkxh6QFoBNazvio7Q03f90tSP9qpJMGwZid9hJEElplW8p43D3DdxXykLays2M8V2viYGLbiXvAbOECzwD4IaviOpylX0PaFznSR4ssXd0= my-workstation-home |
Now, open up Notepad and paste the contents into a new file (control + V). Save the file somewhere you will remember — you can save it as a txt file (publickey.txt).
The public key is what will be put on your Site5 account later.
10. Go back to PuttyGen and click on the “Save private key” button on the main window under the “Save the generated key” section. You can call that file “privatekey” or “privatekey.ppk” — make sure to save it somewhere you will be able to find.
Remember: the private key remains private and should never be given to anyone. It does not go on your Site5 account; it stays on your workstation. Keep this file safe or else you will need to re-do everything if the private key is ever lost.
11. You should now have a public and private key file saved on your workstation. You can quit out of PuTTYGen now.
12. The next step is to login to your Site5 account via SSH so you can install your public key.
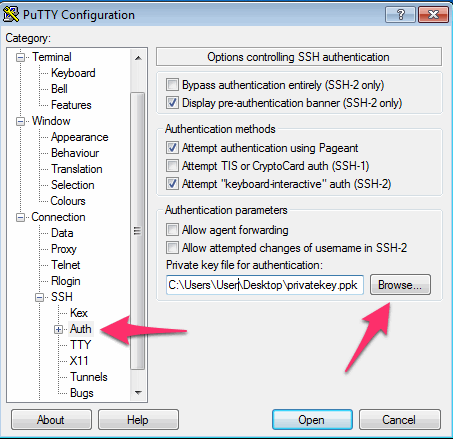
13. Launch PuTTY (found under the “PuTTY” section in your Start Menu). In the “Category” section on the left, scroll down and under Connection > SSH, select the “Auth” option. Where it says “Private key file for authentication:” click on the “Browse” button and find the private key you generated previously and click the “Open” button to load it. The text field should now be filled in with the path to your private key.
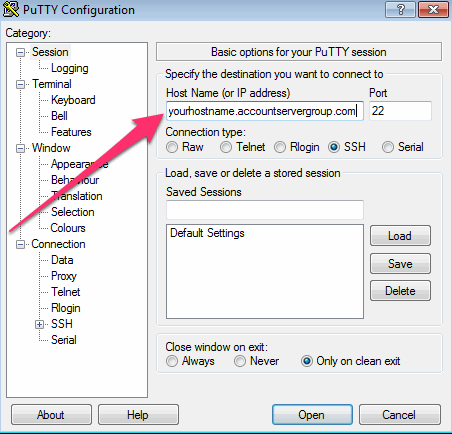
14. Next, in the “Category” section, select the “Session” option towards the top of that list of options. Fill in the “Host Name” field with your account hostname (your account domain or IP address will also work).
Tip: To save this profile for later so you don’t need to do this each time you connect, type a name for this session in the “Saved Sessions” text field on the lower half of that screen. Then, click on the “Save” button to the right and the session will now be saved for later (it will show up where “Default Settings” is showing). Next time you connect to the server, you would simply select the session you created and then click on the “Load” button, and then select the “Open” button at the bottom to load that saved session.
15. Click the “Open” button and then you will be prompted for your Site5 account username and then the password. Enter those and then you will be logged in via SSH.
16. Type the following command at the prompt (and press the enter key on your keyboard when done):
mkdir ~/.ssh; touch ~/.ssh/authorized_keys; chmod 700 ~/.ssh |
That will create a new SSH directory and a new blank file where we will be putting our public key and any additional public keys we want to have access to our account.
17. Next, open up the “authorized_keys” file in your favorite command line text editor (vi/nano/emacs). I will use nano here:
nano ~/.ssh/authorized_keys |
Note: Once you have made your changes, you can exit nano by pressing “Ctrl+X”, then press “Y”, and finally “enter” to confirm the overwrite/filename.
You now need to go to your workstation and find where you saved the public key you generated earlier in PuTTYGen (make sure you get the public key, not the private key!). Copy and paste the contents of the public key into the “authorized_keys” file on your Site5 server. It should paste as a single line, which is fine. Save the file and exit PuTTY.
18. Now, re-open PuTTY and make a new connection to your Site5 account like you did before (make sure to load your saved session or follow steps 13 to 15 again). You will be prompted for your login name, but this time you will not be prompted for your account password but instead will be prompted for your SSH key passphrase. The output should look something like this:
Authenticating with public key "my-workstation-home" Passphrase for key "my-workstation-home": |
After you enter your passphrase and hit Enter, you should be logged in to your account via SSH.


Ponobill April 9, 2012 at 3:02 pm
This is useless, I need the host name
John Oliver at Site5 April 9, 2012 at 3:21 pm
Hello Ponobill,
If you are referring to the host name in step 14, you can use either your domain name or IP address. If that is not what you are referring to, please let us know.
Alvin Dagger April 22, 2012 at 7:21 pm
What is the proper way to setup the ssh host/server to only accept public key authentication? (if it is possible on the site5 hosting accounts)
Thank You
Alvin
John Oliver at Site5 April 23, 2012 at 5:17 pm
Hello Alvin,
Sorry, but unfortunately that option is not available. That is a server wide setting, so all of the users on the server would then also be forced to use keys.
Jason Nugent May 23, 2012 at 1:23 am
I’m sorry, I’m just really, really frustrated by this. This is a LOT of work to do something that my previous server would allow me to simply login and do. Why can’t I do this without the need for this putty nonsense?
John Oliver at Site5 May 23, 2012 at 5:31 pm
I am sorry to hear that this is frustrating you. You don’t need to use SSH keys in order to connect to your account via SSH. You can use the same username/password that you use for the main FTP account if that works better for you.
Jeff July 25, 2012 at 9:19 am
Is there a delay in the redirect starting to work. I think I’ve done everything right. But, the redirect isn’t live yet. I understood it to be immediate. Thanks.
Anthony Licursi at Site5 July 25, 2012 at 10:30 am
Hey Jeff,
Can you contact support at https://backstage.site5.com ? We’ll get your redirect working :) This article is about SSH keys, so it won’t help you out with redirects.
ali.t March 24, 2013 at 7:52 am
Hello, Thank you for your tutorial. Clear enough. But
1, please update your tutorial to explain how to SAVE the authorized_keys file in vi.
It might seem a simple thing to you but for people like myself who had never even heard of vi until now, how in the world would they know how to save? It’s not like this stuff is even remotely intuitive.
For those like myself who are wading through this stuff clueless: the way to save – according to this tutorial http://www.cyberciti.biz/faq/save-file-in-vi-vim-linux-apple-macos-unix-bsd/ —
you have to press ESC then type :wq
2. So now to use ssh, I have type in my username and key passphrase instead of previously username and site5 password.
So there is no savings in amount of typing i have to do for each login – correct?
It’s just now my connection is more secure, correct. Unless someone has my private key on their machine, they can’t login, correct?
John Oliver at Site5 March 27, 2013 at 1:41 pm
Hello Ali,
Thank you for your comment!
I will answer each one of your questions in order…
1) Thank you for bringing the lack of information to our attention. I have updated this article and changed the steps to use nano (an easier editor to use) instead of vi.
2) You now have two options of logging into SSH. You can either use your username and key file (you will be prompted for your passphrase – if you have one) or you can use your standard username and password combination. Our SSH server is setup to allow both.
In regards to the amount of typing, you could use a key without a passphrase, however, it is HIGHLY discouraged.
Because our server allows both key based login and the standard username/password login, it is not necessarily more “secure,” but in some situations, it makes SSH easier to use.
If you have any questions, please feel free to leave a comment here, or if you would prefer, you can speak to our support department directly by opening a ticket through Backstage.
Happy Hosting!
Anthony December 10, 2014 at 12:21 am
The security risks inherent with the use passwords make key pairs a more secure option generally, because they involve breaching the encrypted key on the client, which requires access to your computer, and then cracking your passphrase, rather than just guessing a password. However, having both options enabled reduces collective security to the lesser of the two. Additionally, using key pairs enables you to pair more than one key to a single user, as a form of access control. I use this schema to allow 5 collaborators to log in to the git account on my private server.
Liz Windgate May 13, 2013 at 3:41 pm
authorized_keys? mentioned in step 17, previously not mentioned. Just Private and Public keys. So what is that?
http://www.nano-editor.org/download.php
Do we really need to download nano can’t we just type that into the dos window we have using to type user name, etc in so far.
BTW, I cannot find on my account what my user name is. I thought it was my login email. But apparently it is the FTP user name for this exercise.
I have more than one FTP account and finally used online chat to help setup my SSH. Even with chat help I was not able to complete the instructions. As I don’t know how to generate the authorized_keys and online chat did not understand. To my surprise, I can access that site’s account using SFTP with FireZilla (apparently that software has been updated to handle SFTP) because support did set up the SSH shell (is that the right way to say that?)
The steps and process need some clarification. For instance its not your hosting account user name (step 15), its your FTP user name and apparently SSH has to be set up on each domain’s file transfer account. What a time consuming process for multiple sites.! :(
In step 2 is it possible to select all users to take care of entire hosting accounts with multiple domains?
John Oliver at Site5 May 14, 2013 at 4:31 pm
Hello Liz,
I hope this comment finds you well!
I will answer each one of your questions inline…
“authorized_keys? mentioned in step 17, previously not mentioned. Just Private and Public keys. So what is that?”
authorized_keys is a file that is already on the server. This is where you place the public key you created so that the server knows what to do with it.
“Do we really need to download nano can’t we just type that into the dos window we have using to type user name, etc in so far.”
Nano is already installed on all of our servers. All you need to do is enter the command “nano” followed by the file you wish to edit.
“BTW, I cannot find on my account what my user name is. I thought it was my login email. But apparently it is the FTP user name for this exercise.”
You are correct, the login credentials are the same as your FTP account.
“I have more than one FTP account and finally used online chat to help setup my SSH. Even with chat help I was not able to complete the instructions. As I don’t know how to generate the authorized_keys and online chat did not understand. To my surprise, I can access that site’s account using SFTP with FireZilla (apparently that software has been updated to handle SFTP) because support did set up the SSH shell (is that the right way to say that?)”
Because SSH is enabled by default on all of our services, and because SSH Keys are not required to login, SSH and sFTP work out of the box. Also, another thing to keep in mind, you only have one SSH user. Additional add-on FTP accounts don’t have access to SSH or sFTP.
“The steps and process need some clarification. For instance its not your hosting account user name (step 15), its your FTP user name and apparently SSH has to be set up on each domain’s file transfer account. What a time consuming process for multiple sites.! :(”
Thank you for the feedback! I will make sure that the points get clarified to make it more clear to our viewers.
“In step 2 is it possible to select all users to take care of entire hosting accounts with multiple domains?”
That is referring to the user accounts on your actual computer, not the server.
If you have any questions, please feel free to leave a comment here, or if you prefer, you can contact our support department directly by opening a ticket though Backstage.
Liz Windgate May 13, 2013 at 3:42 pm
Note: You do NOT need to generate/use keys to access your Site5 account via SSH.
Wow I did not see that at the top of the article
So how is that done??
John Oliver at Site5 May 14, 2013 at 4:31 pm
Hello again Liz,
You can simply use the same login credentials that you use for your main FTP/sFTP account when prompted to login.
If you have any questions, please feel free to leave a comment here, or if you prefer, you can contact our support department directly by opening a ticket though Backstage.
Liz Windgate May 31, 2013 at 9:44 am
Regarding “You can simply use the same login credentials that you use for your main FTP/sFTP account when prompted to login.”
I think you mean on the site5 file manager. Not in an FTP client like FireFTP. To use SSH I still need to use Putty or FileZila, correct? Still need to generate keys.
Thanks for your follow up :)
John Oliver at Site5 May 31, 2013 at 6:08 pm
Hello again Liz,
I hope you are well!
The information I originally provided is correct. Your SiteAdmin/FTP/sFTP/SSH (not Backstage) credential are all the same.
While you can use keys to login, they are not required for our SSH services. We provide it as an option for people that prefer to use keys to login to SSH. If you don’t want to use keys, just login with your username and password.
Happy Hosting! :)
Andy Whitman May 28, 2013 at 11:54 am
Thanks for your tutorial. I till now did not actually know how to generate a public/private SSH key pair on a Windows operating system. Your tutorial is really detailed and doesn’t miss out on even one relevant point. I have downloaded the Putty Installer, so let’s see how my installation goes.
neha August 1, 2013 at 3:10 am
after browsing private key there is a problem in loading can you help me with a solution
John Oliver at Site5 August 2, 2013 at 4:56 pm
Hello Neha,
I hope this comment finds you well.
Because of the nature of the problem you are facing, could you please contact our support department so that we can better assess the situation and help come up with a fix for the problem?
You can open a ticket with our support department by visiting the support tab in Backstage, or by emailing us directly at [email protected]
We look forward to hearing from you and helping you get this problem resolved.
sabrina August 2, 2013 at 12:19 pm
I have putty installed, and set up some session on it already, when I try to click on the puttygen exe for generating keys, I got unspecified error from the dialog box, is it because I have some session open and I need to close them in order to create new keys? Thanks,
John Oliver at Site5 August 5, 2013 at 3:26 pm
Hello Sabrina,
That is very odd indeed.
Could you try closing the session to see if it works then? I doubt it will make a difference, but it is worth trying.
If that does not work, could you try re-installing PuTTY to see if that fixes the problem?
If that does not help, I recommend trying a different computer (if possible) and seeing if it works there.
If using another computer is not possible, you may need to leave feedback on the official PuTTY website letting them know of the error and seeing if they have any recommendations on how to proceed.
Please let us know if you were able to get past the error.
Annielex September 3, 2013 at 5:11 pm
Dear Sirs,
I run a tour operator and we work with several international clients. At the moment we are not able to work because all mails bouce back. Can you please advice what to do? we are loosing money today!!!
Thanks and looking forward to receive your help.
Annie.-
John Oliver at Site5 September 4, 2013 at 10:37 am
Hello Annie,
I am sorry to hear about the issue you are facing.
In this situation, I recommend that you contact our support department so that we can better troubleshoot the problem and help come up with a solution.
You can contact our support department by opening a ticket through Backstage. For information on how to do this, please see the following link…
http://kb.site5.com/control/backstage/how-to-login-to-backstage-and-submit-a-support-ticket/
We look forward to hearing from you and helping to get the issue resolved.
CalleRock October 22, 2013 at 10:43 am
Dear Sirs,
I followed the steps and when i try to browse and open my private key It didn’t open the private key that i setup from the steps above.
Please let me know what I’ve missed or something. Thank you so much!
John Oliver at Site5 October 23, 2013 at 5:19 pm
Hello,
I hope this reply finds you well!
I am sorry to hear about the problems you are facing. Can you please let us know the error (if any) when you try to open the private key? Can you also please let us know what step you encountered the issue?
We look forward to hearing from you and helping you resolve this issue.
maryam October 23, 2013 at 11:19 pm
Hi
I installed it and run it, but when the window is opened , it ask for login when I entered my username is has a message “Using keyboard-interactive authentication.”
and after that ask for password, when ever i type my password it has a error. the error is you access is denied.
please help me
what should i do?
John Oliver at Site5 October 25, 2013 at 4:53 pm
Hello again,
Can you please confirm that you have selected your key (*.ppk file) in step 13 of the article above? If so, the password you are being prompted should be the same password you entered in step 8.
Please let us know if this helps or if you are still having issues. If you are continuing to have issues, please feel free to leave a comment here, or if you prefer, you can contact our support team directly by opening a ticket through Backstage.
We look forward to hearing from you and helping you resolve this issue.
Oriol soler November 15, 2013 at 8:40 am
I’ve spent about 2 days trying to connect ssh following this tutorial. Finally I’ve found the problem:
The host name should be username@hostname following Putty Indications.
James Davey November 15, 2013 at 9:58 am
Hello Oriol,
Glad to hear this worked out for you. In the future, please feel free to contact us if you have any issues, as we are always here to help, and happy to do so.
Skyjammer April 2, 2014 at 11:13 am
Hi. First-off, a big thank you for this detailed write-up. I found it extremely helpful. I was initially unable to get my laptop running windows, to connect to the target linux host. I had putty-gen set to use “ssh-2” for key generation, but every time I tried to connect to the host using the generated public key via putty, I kept getting the message “Server has refused key”.
After doing some research, it turns out alI I needed to do was rename my pub key file on the linux server from “authorized_keys”, to “authorized_keys2”, and set the appropriate permissions. Once I did this, and retried to connect via putty, I had success, and received the message “Authenticating with public key “, and was able to login after entering my passphrase.
Thanks again.
gilmi October 28, 2014 at 6:48 am
Putty is a great a software for windows when we working with serves. Do u know any software for Apple.
James Davey October 28, 2014 at 12:18 pm
Hello,
OSX and other Apple operating systems actually have an application called Terminal that will allow this. You would SSH using a command in this, but it is fairly straightforward. Your Finder application should be able to bring you to Terminal, and from there you would use the following:
ssh [email protected]
Replace ‘user’ with your hosting username, and ‘domainname.com’ with your actual domain name.
xuất tinh sớm January 7, 2015 at 9:43 pm
i setting ssh but i lost password to access ssh
how to i can get password again?
thank so much
James Davey January 8, 2015 at 6:08 am
Your SSH password is the same as your SiteAdmin password. If you do not recall this, we can resend your welcome letter with this information. Simply contact our support team via chat, and we will be happy to do this for you.
the January 10, 2015 at 2:37 am
what hostname or whose ip address is required in putty?
And is the port 22 always for SSH?
Mark McQuaid January 12, 2015 at 10:03 am
Hello,
You are most certainly correct, the port is always going to be 22. With regards to the hostname/ip address, it would be the IP address that you received when you signed up for our services or if you are pointing your domain/website to our servers, then you can certainly just use your domain name.
Hope this helps!
Priya February 25, 2015 at 5:41 am
HI James,
We have windows 32 bit os and sun solaris ( with LDAP) os. we need to sftp the file from windows to solaris. I have followed all the steps mentioned above but the 18th step got failed. Its still asking password. could you please help.
James Davey February 25, 2015 at 10:53 am
Hi Priya,
Are you entering the SSH key passphrase? This will be required, as mentioned in step 18.
Priya February 25, 2015 at 12:58 pm
Yes I did James
James Davey February 26, 2015 at 5:35 am
Hello Priya,
That should be working normally, then. I would suggest you contact our support team on this, and we will be happy to take a look.
Priya Shah February 26, 2015 at 7:21 am
Kindly send me the contact details of support team on my email. Thanks you your support.
I have one more query, Do I need to add the below directive in sshd_config file? is it mandatory?
“#AuthorizedKeysFile /home/sr56181/authorized_keys
James Davey February 26, 2015 at 7:51 am
Hi Priya,
You can open a support ticket from Backstage or by emailing [email protected]
Adding that line, as it is, would do nothing. You would need to remove the # for it to work.
Rishi July 14, 2015 at 4:51 am
Very Helpful. I have tried finding the info related to sftp public key authentication and this link was very helpful.
scsys July 18, 2015 at 5:45 pm
Well, simple understandable guide for me :)
Alice December 2, 2015 at 7:06 am
Hi there,
I hv a query.
I login at putTy by using username and password. And then i enter cmd to connect my server. Example cmd: ssh linux0008@gdcgah.
And then it will prompt the password for “linux0008@gdcgah”. My question is. How to dircet login into the server without password? Because previously when i was login for the first time by using my usernme n pword, then i type ssh “server name” it will be directly connect without promp any pword for server. Can u help me?
Alice
James Davey December 2, 2015 at 9:25 am
Hello Alice,
Did you set up the keys as described here? This would be the best way to do this, though the key itself requires a passphrase. You will always need to authenticate in some way, as any account that does not require some sort of authentication is very insecure, and should not be trusted.
Alice December 2, 2015 at 7:29 pm
Hi James,
Appreciate if u can show me the step one by one?
Alice.
James Davey December 3, 2015 at 5:27 am
Hello Alice,
That’s what this article does :) This is a step-by-step guide to setting up ssh keys on your account.
John Wess December 30, 2015 at 4:25 pm
I am pretty sure I have buggered this good. I have followed the above instructions…except I think I forgot to put a passphrase on the keys. Now when I attempt to log in I get a “Putty Fatal Error: Server unexpectedly closed network connection.”
James Davey December 31, 2015 at 2:54 pm
Hi John,
We can help with that. Have you been in contact with our support team about this?
VF March 31, 2016 at 1:59 am
Hi buddies,
is it possible to install Lets Encrypt free SSL?
James Davey March 31, 2016 at 5:09 am
Hello,
Not at this time, no.